Creating Triggers
Learn how to create triggers for active bots in this section.
Once you've created your bot, you can set up triggers for it. Keep in mind that there are different triggers for SPOT, FUTURES, and FUTURES CLOSE.
- To create a trigger, navigate to the specific bot page.

- For Futures Bots, there is an additional tab called Trigger (CLOSE), which is used for creating triggers to close positions.
Creating a Futures(Open) Trigger
- Click on Create Trigger to open a popup.
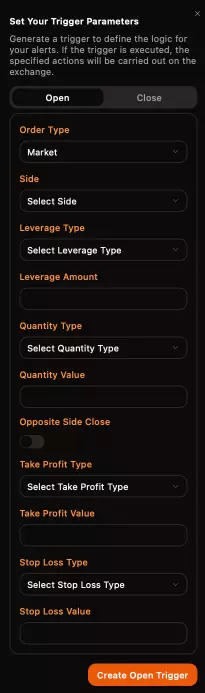
Let's create an OPEN trigger. This trigger will open a position when triggered via TradingView or other platforms.
Futures Trigger (Open) Options
- Order Type: Choose between
MarketorLimitorder types. - Limit Price: Available only for
Limitorders. For Buy orders, the limit price should be below the last price; for Sell orders, it should be above. - Side: Select
Buy/LongorSell/Short, depending on the direction of your order. - Leverage Type: Choose between
IsolatedorCross. - Leverage Amount: The bot supports only integer values (e.g., 1, 20, 100). Decimal values like 1.2 are not accepted.
- Quantity Type: Options include
Percentage,Dollar, orAsset. Note that the bot rounds to the nearest tick size accepted by the exchange. For example, if you setQuantity Typeto Dollar and the value is $60, but 0.001 BTC equals $50, the order will be placed for 0.001 BTC ($50). - Quantity Value: The amount you want to place. For
Percentage, the max value is 100. ForAsset, use a decimal point (.) for precision, e.g., 0.001. - Opposite Close: If enabled, this option will close an existing position before placing a new one when the opposite trigger is executed.
- Take Profit Type: Options include
Percentage,Dollar, orPrice. ForPercentage, the take profit is set a certain percentage away from the entry price. ForDollar, it is set a specific dollar amount away from the entry price. ForPrice, the take profit is set at the specified price. - Take Profit Value: Enter the value for the selected Take Profit Type. For example, 2 for 2% in
Percentage, 200 for $200 inDollar, or 2399 for a price of $2399 inPrice. - Stop Loss Type: Options include
Percentage,Dollar, orPrice. Similar to take profit, but used for setting a stop loss. - Stop Loss Value: Enter the value for the selected Stop Loss Type. For example, 2 for 2% in
Percentage, 200 for $200 inDollar, or 2399 for a price of $2399 inPrice.
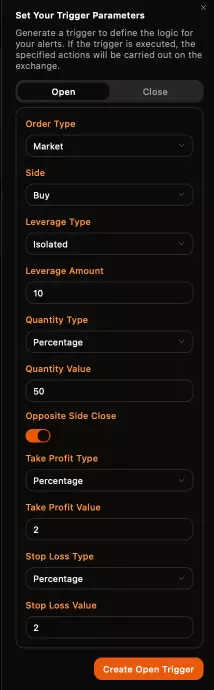
Example of a Valid Futures Open Trigger
To view your created open triggers, go to the Triggers (Open) tab.

A valid trigger should look like this.
Trigger Actions
There are three actions available for triggers:

- Manual Execution: Clicking the green button will manually execute the order from the bot, simulating a TradingView order. This is useful for testing.
- Copy Trigger: This copies the trigger in the correct format for pasting into TradingView or other platforms.
- Delete Trigger: This will delete a trigger. This action cannot be undone.
Remember:
If you add or remove anything from the trigger syntax , it will be invalid , only valid structure is
{"trigger_id":"your_trigger_id"}
Creating a Futures(Close) Trigger
- Click on Create Trigger to open a popup.
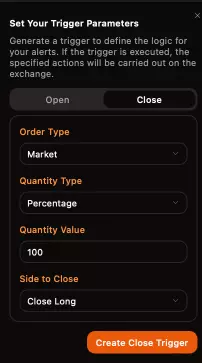
Let's create a Close trigger. This will close a position when the trigger is activated via TradingView or other platforms.
Futures Trigger (Close) Options
- Order Type: Only
Marketorders are accepted for closing, ensuring the order closes at the targeted price. - Quantity Type: Choose between
Dollar,Percentage, orAsset. To close the full position, set it toPercentagewith a value of 100. - Quantity Value: For
Percentage, 100 will close the full position. ForAsset, use a decimal point (.) for precision, e.g., 0.001. - Side to Close: Choose
Close_Buy/Close_LongorClose_Sell/Close_Short, depending on the position side you want to close.
You can find your created close triggers under the Triggers (CLOSE) tab.
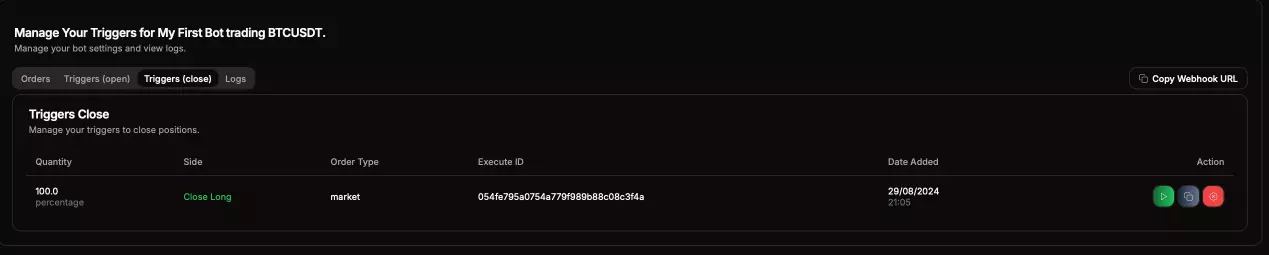
Trigger Actions
There are three actions available for triggers:
- Manual Execution: Clicking the green button will manually close the order from the bot, simulating a TradingView order. This is useful for testing.
- Copy Trigger: This copies the trigger in the correct format for pasting into TradingView or other platforms.
- Delete Trigger: This will delete a trigger. This action cannot be undone.
Remember:
If you add or remove anything from the trigger syntax , it will be invalid , only valid structure is
{"trigger_id":"your_trigger_id"}
Creating a Spot Trigger
- Click on Create Trigger to open a popup. Make sure you have a
SpotBot set up to create a spot trigger.
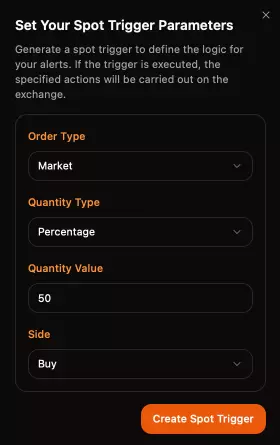
Let's create a SPOT trigger. This trigger will place an order when activated via TradingView or other platforms.
Spot Trigger Options
- Order Type: Choose between
MarketorLimitorder types. - Limit Price: Available only for
Limitorders. For Buy orders, the limit price must be set below the last price; for Sell orders, it must be set above the last price. - Side: Select either
Buy/LongorSell/Short, depending on the direction of your order. - Quantity Type: Options include
Dollar,Percentage, orAsset. To place an order for the full position, setPercentageto 100. - Quantity Value: For
Percentage, 100 will place an order for the entire position. ForAsset, use a decimal point (.) for precision, such as 0.001. - Side to Open: Choose
Buy/LongorSell/Short, based on the order side you wish to place.
To view your created spot triggers, go to the Triggers tab.
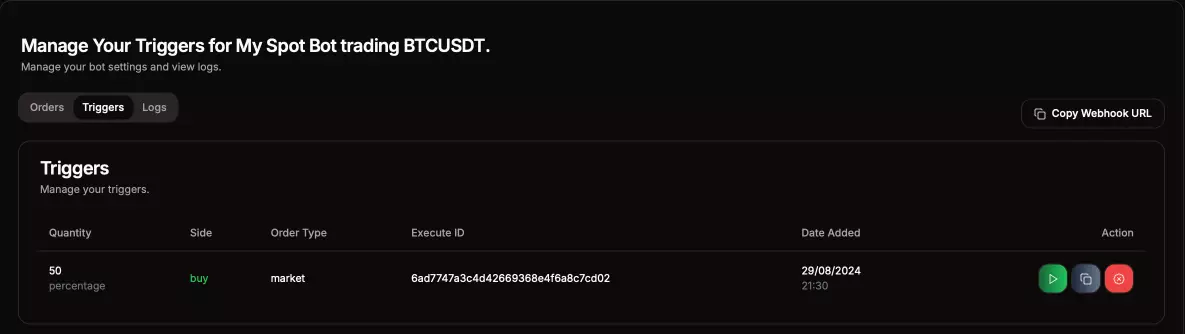
Spot Trigger Actions
There are three actions available for spot triggers:
- Manual Execution: Click the green button to manually execute the order from the bot, mimicking what would happen through a TradingView order. This is useful for testing.
- Copy Trigger: This copies the trigger in the correct format, allowing you to paste it into TradingView or other platforms.
- Delete Trigger: This action deletes a trigger and cannot be undone.
Remember:
If you add or remove anything from the trigger syntax , it will be invalid , only valid structure is
{"trigger_id":"your_trigger_id"}
Manage Orders
The next section will guide you on how to monitor your Orders placed from the triggers.